

A beginner’s guide through the AI pipeline fog.
If you put a room of designers together and asked how their work actually gets from Figma into real code with AI, you would get a few seconds of silence and then a lot of different answers, none of them confident. That is not because you missed a memo. There simply is no memo yet. So let me walk through it in plain words.
The demos are real. Your confusion is also real.
You have seen the videos. Someone connects Figma to an AI tool, types a sentence, and a working screen appears in seconds. It looks like the whole problem is solved. Then you try it on your own real project, and it falls apart, and you assume you did something wrong.
You did not. The demos show you one clean layer working under perfect conditions. Your actual work needs three or four layers stacked together, and nobody shows you the stack, because the stack is where it gets messy and half-solved. The confusion comes from not knowing they are separate things at different stages that need different skills.
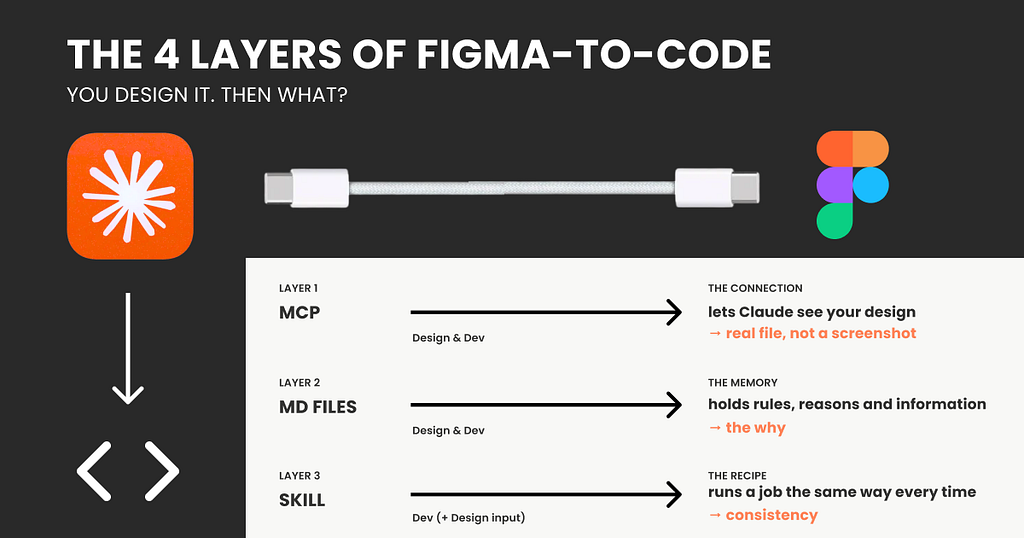
The design-to-code stack, one layer at a time
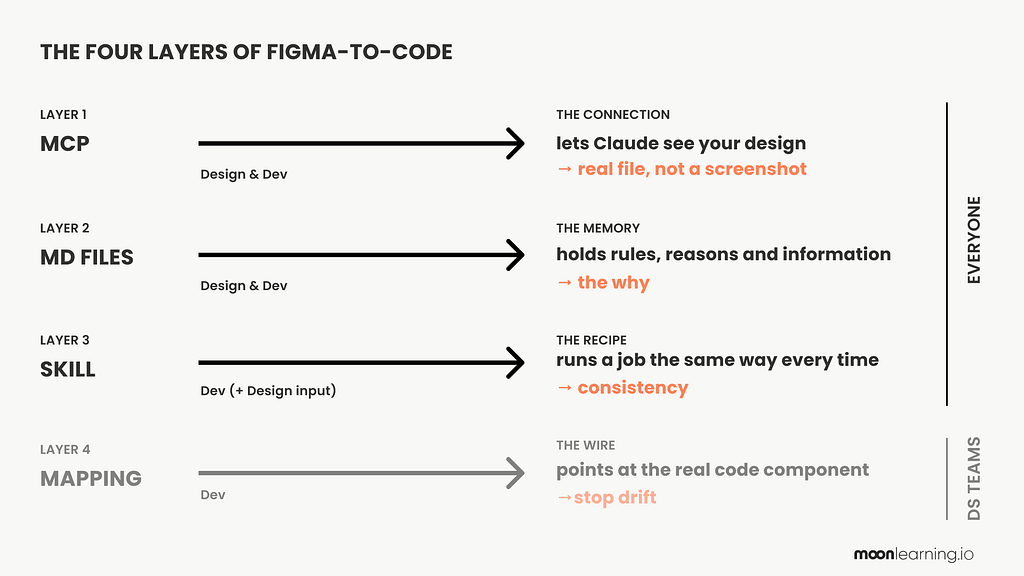
Layer 1: The MCP. The connection.
MCP is one of those new words flying around, so let’s first understand what it does and does not do.
Think of an AI assistant like Claude (the same goes for Cursor, Copilot and others; I will use Claude as an example in this article) as very smart, but sitting in a sealed room. It can reason beautifully, but on its own, it cannot see your files, your Figma, your tools. It only knows what you paste into the chat.
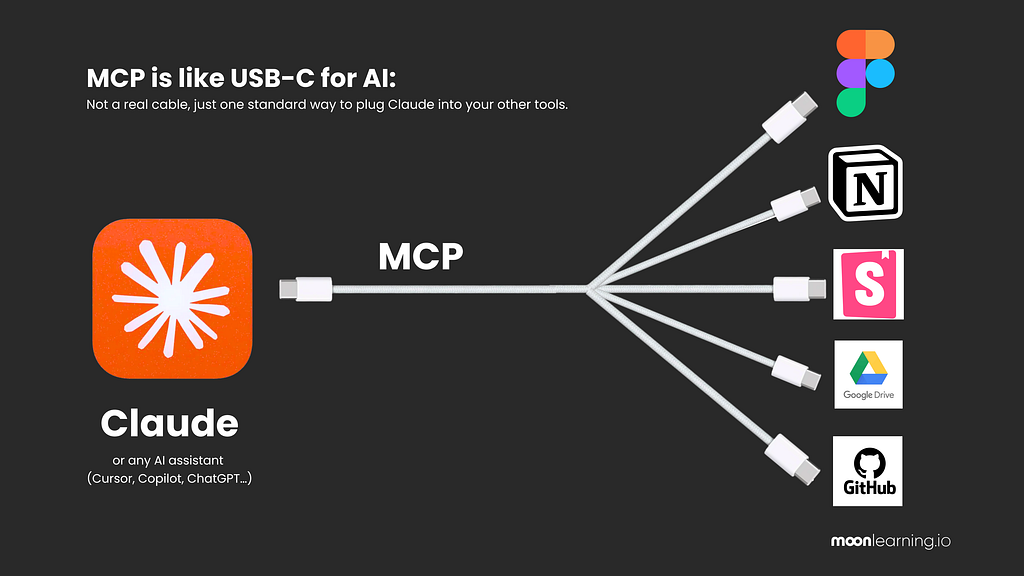
An MCP is how you open a door in that room. The name stands for Model Context Protocol, but forget the words. The useful picture is USB-C. USB-C is one standard plug that connects your laptop to almost anything: a screen, a drive, a camera, so you do not need a different cable for each anymore. An MCP is the same idea for AI: one standard way to plug a tool into Claude. Plug in the Figma one, and Claude can look inside Figma. Plug in others, and it can reach your other tools the same way.
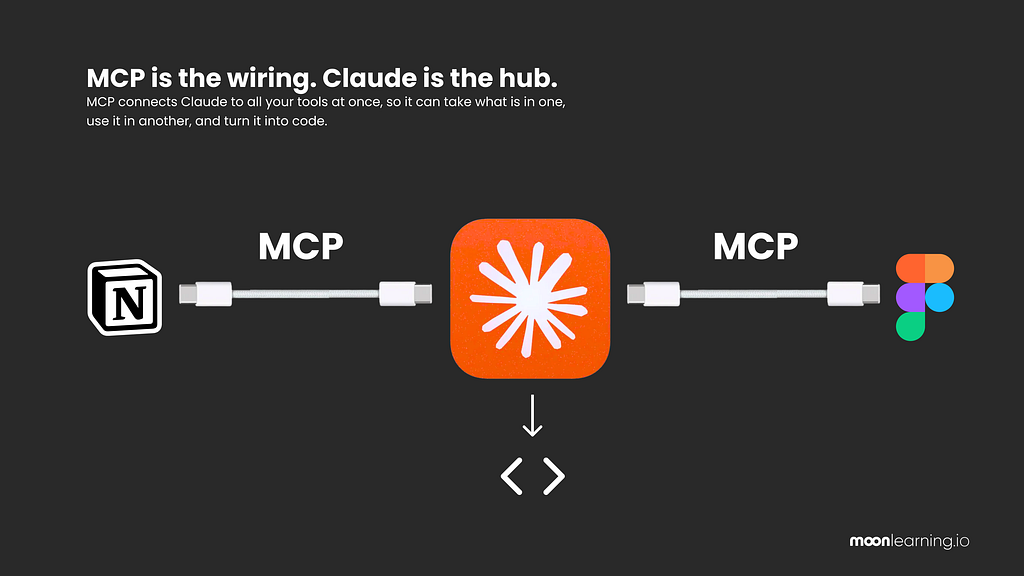
MCP is only the wiring, and Claude is the mind. And it is not plugged into one tool at a time; it sits in the middle like a hub, connected to all of them at once, so for example, it can pull your notes from Notion and read your design in Figma in the same moment, work out what matters, and turn it into code. The wiring just carries the signal. Claude is the part that understands what it is looking at.
So in real terms: without it, you take a screenshot of your design, paste it into the chat, and hope Claude understands the picture. With the Figma MCP connected, Claude reaches into the actual file and reads the real thing: your exact colours, your spacing, your fonts, how the layout is stacked. Not a photo of your design, but the design and structure itself.
What MCP fixes: Claude can finally see your work, details and structure properly in its context, instead of squinting at an image you paste.
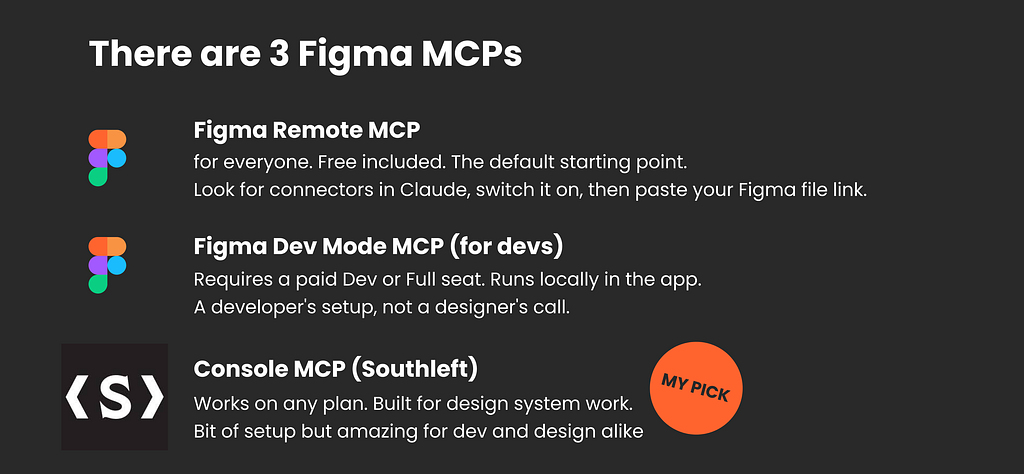
Where does it come from? How to access it?
You don’t make an MCP; you connect to one that the tool’s makers have already built. For Figma, there are three options: you can switch them on via connectors (in Claude, the little plus button in the chat window) or install them, depending on which you pick. See the three options below.
The gap it leaves:
it reads your values and your structure, not your code. It sees a button and copies the colour and the corners, but it has no idea your team already has a real, reusable button sitting in the codebase (or not… or if you have a codebase at all). So it quietly builds a fresh lookalike every time. Your colours, yes. Your real component, no. This is fine for a quick website, but not enough for a scaling product.
Layer 2: The markdown (md) files. The memory.
The pipe lets Claude see your design, but it cannot see what is in your head. Your rules, the choices you would never write on the canvas but always make anyway.
A markdown file is where you put all the rules and reasons of your design. It is just a plain text note you write once and let Claude read, and it is the one place your reasoning actually survives, because your Figma file holds what things look like and your code holds what they do, but only this note holds why. Think of it like the handover note you would leave a freelancer joining your project.
It says things like here are my breakpoints, my colours and all you need to know. Here are the rules and reasons I always follow. “Use the quiet button for secondary actions.” “Never two loud buttons on one screen.” Claude, reading your Figma file, has no way to know any of that. This note hands it over.
What is a markdown file? Where is it and who makes it?
Markdown (md) is just a plain text file, saved with a .md ending, the same way a document is saved as .pdf, with a little light formatting like a README uses, and its charm is that humans and machines both read it with no translation in between. You rarely write it from scratch: you let the MCP read your Figma file, have Claude draft a first version from your colours, spacing and components, then refine it in the chat or by hand.
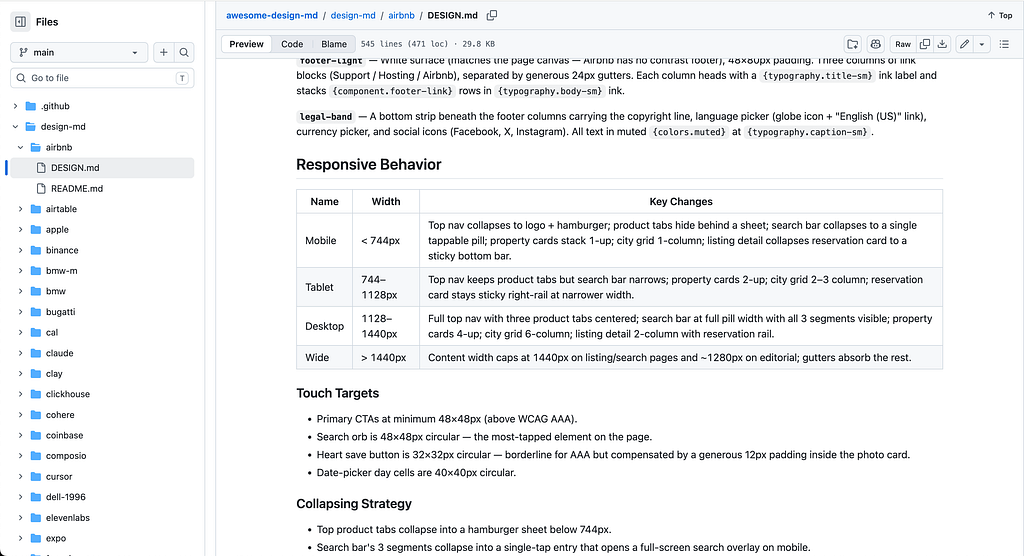
Where it lives depends on how you work. At its simplest, it is just a file sitting in your project folder. If you work with Claude, that file is called CLAUDE.md, and Claude reads it automatically every time, so you never have to re-explain yourself. Think of CLAUDE.md as the front page: it holds your main rules, and it can point to other, more focused notes, like a design.md for your design rules or a content.md for your writing, and those extra files you can name pretty much anything you like, because Claude just follows the trail and reads them too. In bigger setups, like a design system team, the same files live right alongside the code in the codebase, so the whole team and every tool work from one shared source, but more on that later. If you want to see what real ones look like, github.com/voltagent/awesome-design-md is a good place to browse examples.
The best part is that it costs nothing and it compounds: no tooling, no engineer, just text, and every time you catch Claude (or others) getting something wrong you fold the fix back in, so the note slowly turns into a real memory of how you work.
What it fixes:
Claude now works with your judgment, not just your pixels.
The gap it leaves:
A markdown file is guidance Claude reads, not a rule that runs, so it can only ever shift the odds in your favour, never hold the line. This is because Claude reads your rule and usually follows it, but can still interpret it loosely or quietly drop it when a screen gets complicated. Also, the note gets weaker the bigger it grows, since ten sharp rules get followed, but a sprawling rulebook starts competing with itself. On top of that, it goes out of date the moment you change something and forget to update it, so a note nobody keeps current keeps handing Claude yesterday’s directions with full confidence.
Think of it like that same freelancer we had in our earlier example that you handed the note to on day one: they will have a good idea of what to do, but they forget bits here and there, and they know nothing about whatever you changed after you wrote it, so you still have to check.
Side note: Markdown is not new at all. It was born back in 2004 for writing on the web, and it came back into fashion for one simple reason: LLMs are trained on huge amounts of text, so they read it as easily as a person reads a memo.
Layer 3: The skill. The recipe.
A skill is one step up from a note. A note tells Claude what to know.
A skill tells the AI how to do a specific job, the same way every time, like a fixed rule to enforce.
Picture the difference between explaining a dish out loud every night and writing the recipe card once, with steps and measurements. A skill is a small folder holding those steps, and sometimes a bit of actual code, that Claude picks up only when that job comes around. Instead of re-explaining “this is how we build our components” each time, the skill holds the method and runs it consistently, but only when it is needed.
What is a skill? Where does it live, and who makes it?
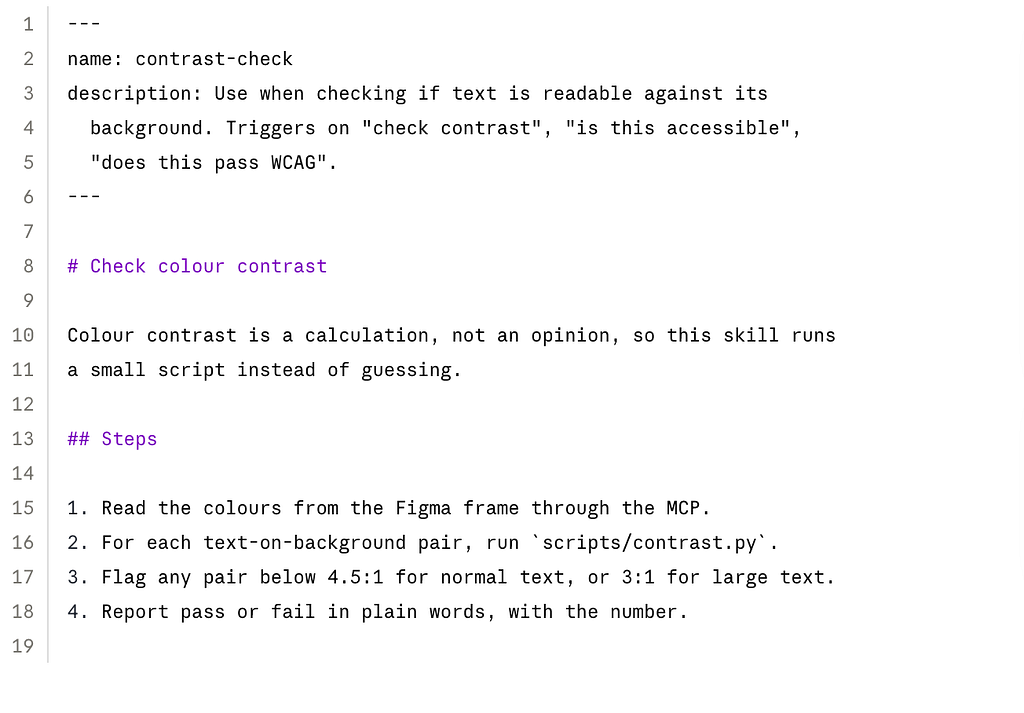
A skill is just a folder with a plain instruction file inside (a SKILL.md, markdown again) plus any extra bits it needs, like a script or a template. It stays out of the way until a task matches its description, then it wakes up. Where it lives depends on the job: it can sit in your Claude setup, alongside your code in the project, or come baked into a tool you already use. Figma, for example, ships its own skills for design jobs like turning a frame into a component or building out a library, so some skills you make yourself and some arrive with the tools you already work in.

You do not have to build them from scratch: some come ready made (a Word doc, a PDF, a slide deck, or Figma’s own component skills), others are shared by the community, and when you want your own, the easiest way is to just ask Claude to make it, you describe the job you keep doing by hand and it writes the skill for you.

The one-line difference from a note: a note is background knowledge Claude always carries, a skill is a tool it reaches for only when the job calls for it.
What it fixes:
The tasks you do over and over no longer come out slightly different every time.
The gap it leaves:
It is still something you write and keep up to date, and it still does not tie itself to your design. It is a very good recipe. It is not a wire connecting two rooms.
Layer 4: The mapping. The real wire.
Everything so far still leaves your design and your code as two separate worlds. This is the layer that finally joins them, and it is also the one that needs developers.
First, a word people throw around: the codebase. Your design lives in Figma. Your actual product, the thing people click and use, lives somewhere else entirely, in files that developers write and edit. That pile of files is the codebase. It is the real, working version of your product. Figma is the drawing. The codebase is the built thing. And if you are a solo designer making a quick website, you might not really have one, which is completely fine and already tells you this layer is not for you yet.
Inside a serious codebase, the real components live somewhere the developers can browse and reuse them: a catalogue of every real, coded button, card and input, with all its states, kept up to date by the team. The best-known tool for this is Storybook, though it is not the only one. The point is just that the code side has its own component library, separate from your Figma one. Figma shows the design of the button. That catalogue shows the actual working one.
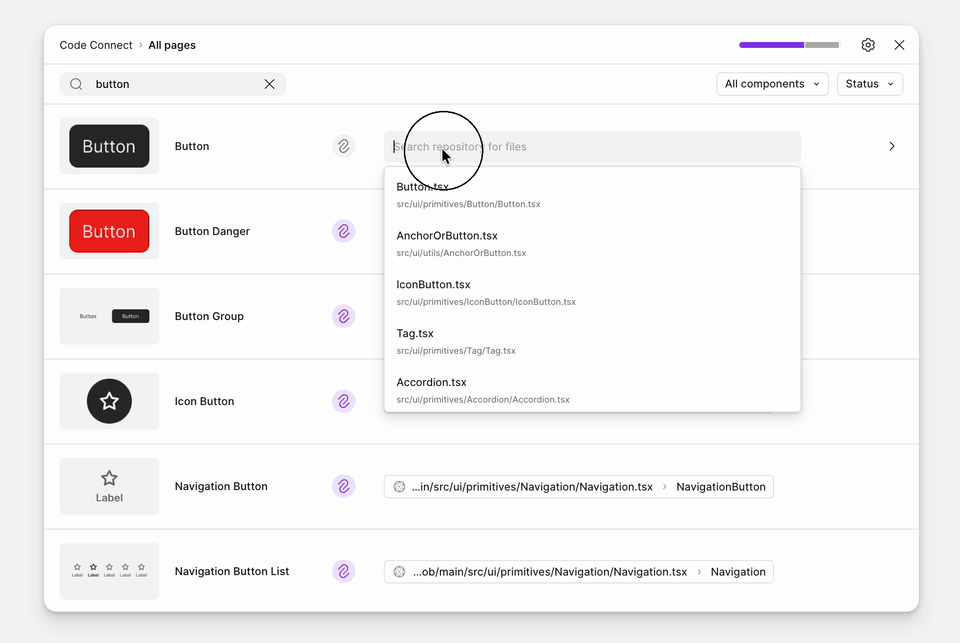
The mapping is the wire between those two libraries. Its Figma name is Code Connect, but the picture is what matters: you formally tell the system “this button in Figma is that exact button in the code, and here is where it lives.” Once the wire is in place, Claude stops guessing (in theory, though it is not always that smooth) and stops building lookalikes. It points at your real component, the same one already running in your product.
What it fixes:
The drift. Design and code stop being two separate snapshots and start pointing at one shared source of truth. In theory, this is new tooling in the making; it is in use but not perfect, and is constantly being improved.
The gap it leaves:
It is real work, and it is not designer work. It is written in code, maintained by developers, checked whenever something changes, and wired into the way the product gets built. It has an owner and a running cost. Build it without a team to keep it alive, and it rots, because now everyone is trusting a wire that has quietly come loose.
The honest shape of it
Look at the whole stack. Each layer covers the hole under it. The pipe lets Claude see your design. The note carries your rules. The recipe keeps your repeated jobs consistent. And the mapping, the top layer, is the only one that truly welds design and code together so they never drift.
But that top layer needs a codebase, developers, and constant upkeep. Most people do not have that, and should not pretend to. So for almost everyone, the design and the code will drift the moment either side changes, and that is not a sign you set it up wrong. It is simply what these tools are without the expensive wire: they take a snapshot and build from it. When things drift, you regenerate. You do not try to hand-repair a connection that was never really there.
And one honest expectation: If you need more than a static HTML and CSS page, then generating code is not the same as having a live product. What comes out still has to live somewhere, get checked, and usually pass through a developer’s hands at some point. AI shortens the distance from design to code. It does not delete the road.
I am told to just skip Figma and vibe code
You will also meet tools that seem to skip this whole stack: you describe a screen or drop in a design, and a working app appears (Figma Make, Lovable, v0, Bolt and others). They are not cheating. I personally use them a lot, mainly Lovable, for small one-off products or in-house tools where I don’t care much about the design. Some examples to tinker with here. But the same limits apply underneath: they bundle the pipe, and maybe a little of the note, but they skip the mapping entirely and keep no memory of your system, so they build a fresh lookalike (you either connect Figma or they just make one up, usually in Tailwind), not your real component, and they drift the same way. Sidenote: Figma Make does look promising for changing this. I am still waiting on updates there.
These tools are great for getting something up fast. But the moment it has to be real, scalable, secure and built to last, the layers you skipped are exactly the ones you need.
So the rule of thumb is simple: reach for these to explore an idea fast or to ship something small or throwaway, and leave them behind the moment the design has to stay consistent or the code has to last and scale.
So, what should you actually use and do as a Designer in Figma?
Two things, in order. First, get your file clean. Then, match the stack to your size. That is the whole plan.
First: clean files before any layer.
All four layers can only work with what is actually in your Figma file. If your colours are loose hex codes instead of styles or variables, if your spacing is eyeballed instead of auto-layout, if your components are not really components set up in auto layout, then the pipe has nothing clean to read, and the result comes back messy. You do not need a perfect system to start with. But the tidier and more structured your file, the more every layer above pays off. These are simple principles to follow, but you need to know them. You can find a more in-depth article about this here, and I also run courses and workshops about this on moonlearning.io.
Good input is the cheapest upgrade you have. AI tooling moves fast, so be ready for when the pipeline catches up, basic design system principles, in every file, at every level. Full stop.
Then, match the stack to your size.
With your file clean, do not overengineer the rest. Add layers only as you grow.
Stop measuring yourself against a setup built for a company of hundreds.
So, back to our original image, and now it should make way more sense and hopefully calm the overwhelm: You will simply not worry about everything in every team. So let’s run through it, who uses what, and why.
If it is just you
You are solo, maybe a quick site or a product still finding its shape. You need two layers: the pipe and a note. Connect the Figma MCP so Claude builds in your real colours and spacing, and keep one short markdown note listing your reusable pieces and when to use each, pasted in every time. Skip skills until you catch yourself doing the exact same job every day. Forget the mapping completely, you have no codebase to wire it to and no developer to keep it alive. Design in Figma to think and decide, hand it over, and when the result is off, you regenerate. Your job here is taste, not plumbing.
If you are a small team
A designer or two, a developer or two, and now things go out of sync between people, not just tools. Someone updates a button, the code still has last month’s version, and nobody notices until it ships wrong. You need three layers: the pipe, a shared note everyone reads, and maybe one skill for the thing you build over and over. But the layer that actually holds you together is not a tool at all, it is a human habit: whoever changes a component in the code updates the shared note in the same breath. That promise between people is cheaper and more reliable than any wire you could buy at this size for now. You can look at the real mapping later, once your components have settled and stopped changing every week.
I would, however, expect this to change pretty soon. This is a known pain point, and players like Figma and Claude are pushing hard to be the first to fix it in a more usable way.
If you own a (serious) design system
You own the components that a whole company builds on, and you cannot eyeball your way out of drift, because hundreds of screens inherit your mistakes. This is the one tier where all four layers earn their cost, including the mapping. Wire Code Connect or similar to your real components in Storybook or whatever you use (your devs will know best), and add an automatic check that shouts the moment design and code fall out of line, like a smoke alarm. This is real engineering with an owner and a budget. Follow the pioneers in this field, like Nathan Curtis, Brad Frost and TJ Petri, for articles and developments. Agentic AI systems are a topic that moves fast and has its own universe entirely.
And the flip side holds: if you are not this team, do not build like this team, or you will spend your life maintaining a machine you never needed and cannot keep up with.
The one thing that stays yours
Whichever size you are, one part never moves down the stack. Knowing which of the ten versions Claude just made is the good one. Which spacing feels right, which button earns the attention, and when to stop. The layers move your work from Figma toward code. That is still you, and that was always the actual job. So move those designs by hand, make it worthwhile instead of looking at a generating loop all day, that is the side product.
Want to learn more?
If you want to learn about these new workflows in a practical, hands-on and honest way, the same way I’ve tried to write this article, I offer courses for individuals and train in-house teams. Just head to moonlearning.io or contact me for custom team training.
Design. Build. Ship. Become the Designer Engineers Trust
About the author Christine Vallaure
I’m Christine Vallaure, a UI designer, speaker, founder of the learning platform moonlearning.io, and author of theSolo, a book about independent product building. I teach UI design, Figma, and product building with agentic AI to people who want to understand what is actually going on under the hood, through online courses, team training, and conference talks.
Sign up for the newsletter to keep up.
Constitutionally incapable of writing a short article.
You design it. Then what? A clear map of the Figma-to-code AI mess was originally published in UX Collective on Medium, where people are continuing the conversation by highlighting and responding to this story.


