

4 Skills that bind every value to your design system, so you can actually iterate on what Claude builds.

Claude Code can now write directly to the Figma canvas through Figma MCP.
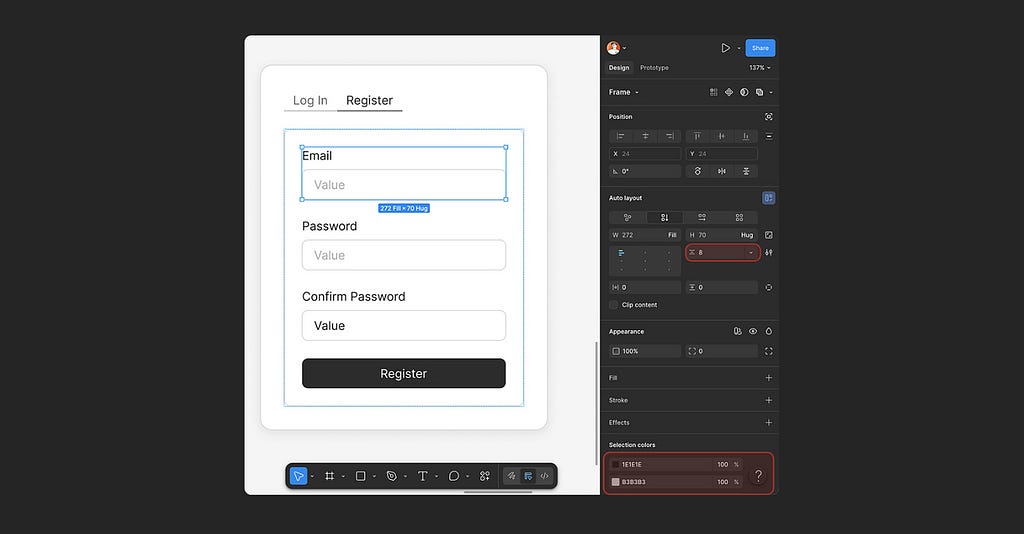
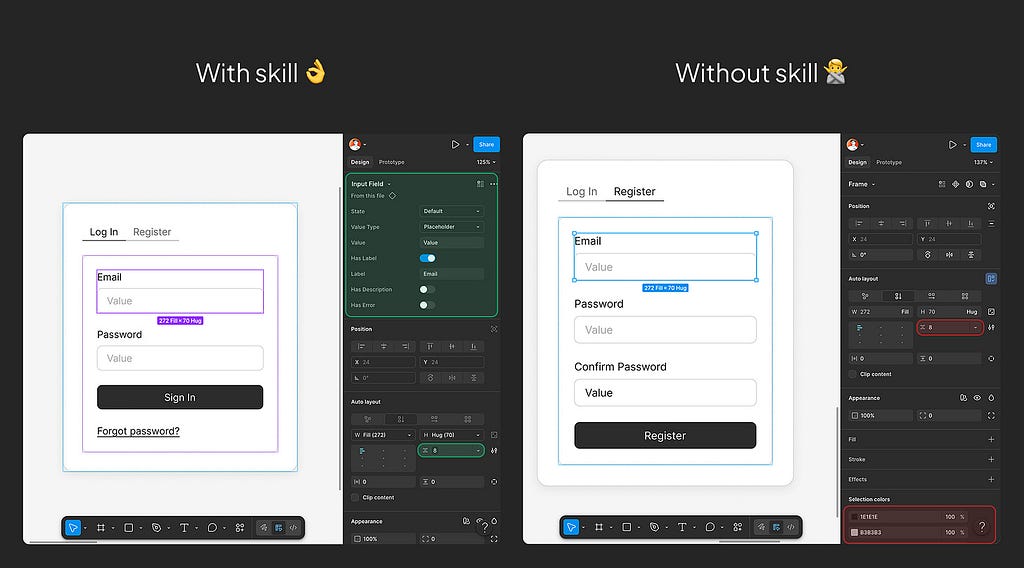
You describe an interface in natural language; it builds it. Visually, the result can be pixel-perfect. But click into any layer and you’ll find #5C6AC4 where color/brand/primary should be, 14 where text/body-sm is defined, a freshly minted one-off component where an existing Button instance is sitting right there in the library.
The design system has all of this. Claude Code used none of it.
The problem isn’t capability. It knows how to call the Figma API, how to query a library, how to bind a variable. It just doesn’t know that in your project, it must. Nobody told it the rules, so it made up its own.
The Harness, and What It Isn’t
In AI engineering, people talk about a concept called Harness:
The constraint framework you build around a model. It defines what the model can do, what it can’t, and how to verify the output. The model is the engine; the harness is everything that makes the engine run by your rules.
I want to be precise here: what I built is not a harness. A harness is an architectural concern. It lives at the system level. What I built is closer to a workflow enforcement layer:
A set of rules that sit inside the harness and govern how the AI behaves in one specific context.
In this case, Figma. And the problem is governance.

Figma has its own governance system: variables, styles, component libraries, naming conventions. But Claude Code operates entirely outside that system.
- Every color value is isolated.
- Every component is improvised.
- Every modification requires re-locating everything from scratch.
- It passes visual QA. It fails structural QA.
The question is straightforward:
How do you make Claude Code work within design system governance, instead of freestyling, in Figma?
Four Skills, Four Rules
Based on that framing, I built a set of Claude Code Skills specifically for Figma design workflows. Four skills, each handling one job.
📎 Install: github.com/senlindesign/claude2figma
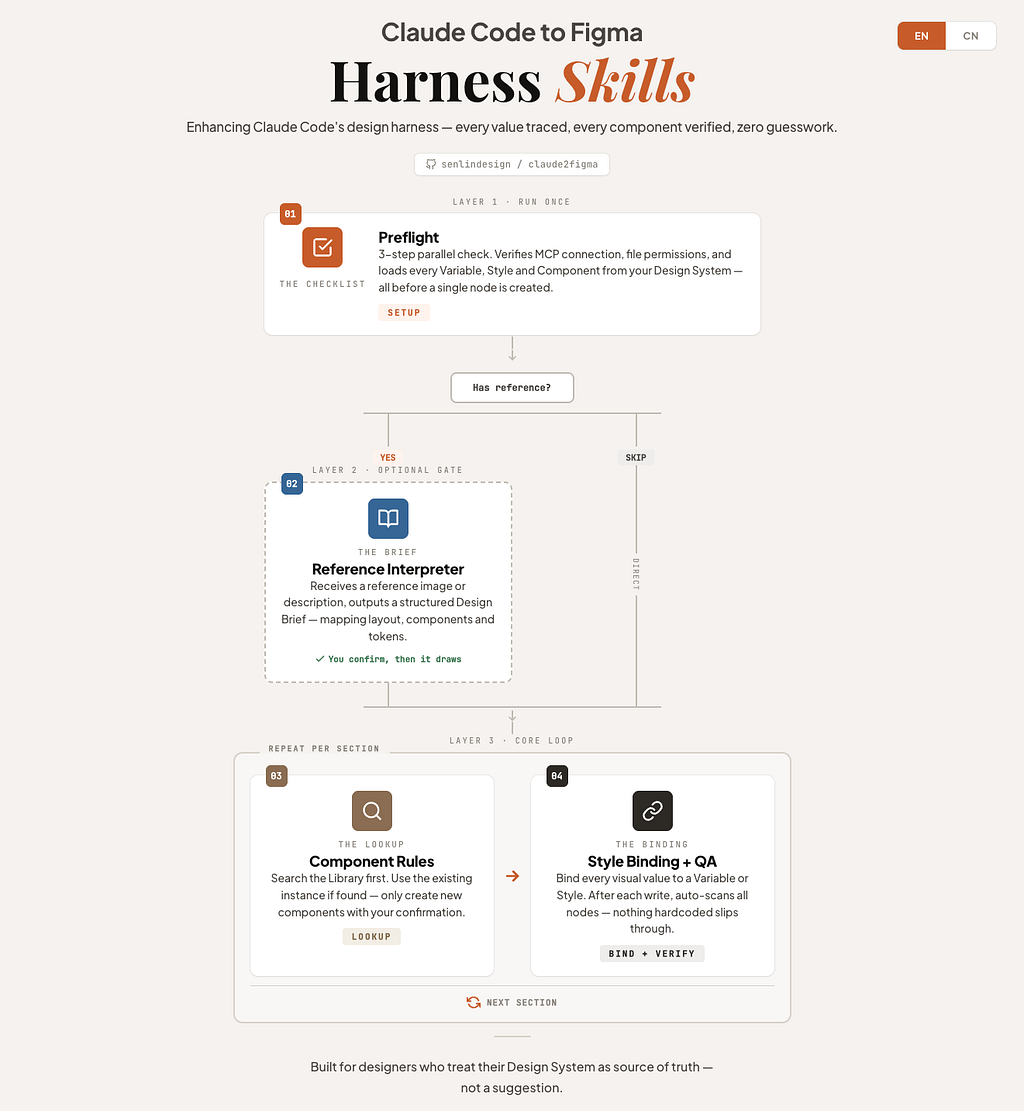
01 | Preflight: Health Check Before Anything Moves

Every design session starts with three parallel checks:
- Is Figma MCP connected?
- Are file read/write permissions in place?
- Are styles, variables, and components from the current file fully loaded?
It outputs a Token Map and Component Registry as the reference baseline for the entire session. Until Preflight passes, no node gets created.
The value is simple: you don’t discover thirty minutes in that your library tokens never loaded.
02 | Reference Interpreter: Plan Before You Build
When you share a screenshot, a reference link, or a design description, this skill triggers. It parses your input into a structured Design Brief: which sections to build, which components to use, which tokens to apply. You confirm direction first. Then construction begins.
03 | Component Rules: Search Before You Create
Every UI construction task follows one rule: search the connected library first. If a matching component exists, use its instance. Only if nothing is found do you build from scratch, and even then, auto layout and semantic naming are mandatory.
This skill changes the AI’s default behavior. Without it, the instinct is to invent. With it, the first move becomes look up.
For any team that maintains a design system, that sequence is the difference between usable and not.
04 | Style Binding: Token Enforcement and QA
Whenever a task involves color, typography, spacing, or border radius, this rule activates. Every visual property must bind to its corresponding variable or style. No raw values accepted.
After writing to Figma, it runs a QA pass, confirming bindings item by item.
This is the most essential of the four. It does exactly one thing: turn #5C6AC4 back into color/brand/primary.
The Tool Follows the Scenario
These skills don’t just solve a token-binding problem. They encode a more fundamental judgment: the same AI tool should play different roles in different contexts, and produce different kinds of output accordingly.

When the designer needs to stay in the loop, Claude Code acts as a design assistant. Its output must be something a human can pick up, modify, and iterate on. That means compliance at every layer: tokens, components, layout structure. All four skills are active. The full governance chain is in effect.
When the goal is a quick prototype, it switches to coding mode. Speed takes priority over compliance. The enforcement layer steps back. Raw values are expected, not exceptions.
AI is powerful enough to write Figma. It’s powerful enough to write React. But the gap between a powerful tool and a usable one is often just a set of rules that nobody wrote.

Further reading
- Claude Code and Figma: Set up the MCP server — Figma
- Claude Code Can’t Design in Figma…But It Can Do This — Jeffrey @ Lytbox
Want to become an AI-native designer? Join my newsletter “Design to Build” for practical tools, real design workflows, and no-code tutorials.
How to make Claude Code follow your design system in Figma was originally published in UX Collective on Medium, where people are continuing the conversation by highlighting and responding to this story.


